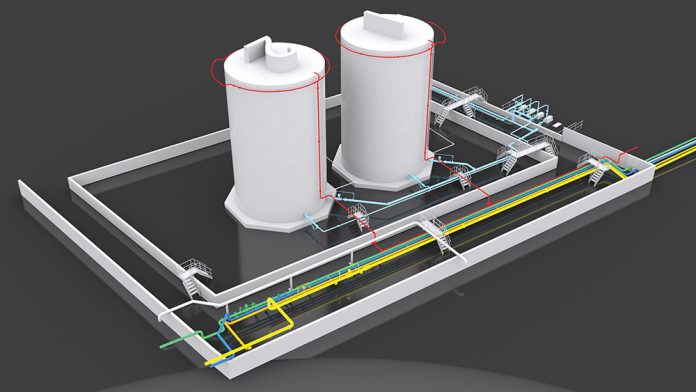
Advanced 3D Laser Solutions (A3D) first job in 2014 was to scan, model and produce inspection packs for a company’s five terminals dotted around the UK. They were recently purchased from another chemical storage company, but once the purchase had gone through the terminals proved to have little to no documentation and at the time they required isometrics for upcoming API570 piping NDT work.
A3Ds solution was to 3D laser survey the sites and from the surveyed point cloud data, produce 3D Autodesk process models, which could then be used to export the required isometrics, in the standards and formats required by the client.
This solution by A3D allowed our client to deliver the required documentation for the upcoming NDT inspections on time, below budget; they also were left with point cloud data, webshare and 3D models which was later used in multiple internal HAZOP meetings. For one of the terminals this same client came back to us, to get further work done from the same point cloud data such as P&IDs, tank health checks, bund volume calculations and general arrangement drawings.
A3D like any company started contacting other companies commercially, explaining the solution along with the time and cost savings that went with it. It quickly became apparent how archaic the traditional methods were for producing NDT inspection drawings, which generally was, that every 5 years when the pipework required testing, the isometrics were redrawn from scratch by the NDT testers and kept as pencil drawn sketches.
So how does this solution work?
This solution isn’t anything new or magical, its simple, we scan your site using 3D laser scanning technology, which I a technology that has been around for over 15 years, it’s faster, safer, cheaper and more accurate than any other surveying method, the data that’s collected is called point cloud data.
Using the collected point cloud data, we model out the process and utility pipework, the pipework recognition software requires at least 80 points to recognise pipework, but the 3D scanner can produce nearly two million per second!
The models are created using Autodesk Plant 3D software, which allows A3D to build the spec driven process models using dimensional data from ASME and DIN catalogues along with the detailed point cloud data. Once the modelling is finished, A3D can extract the isometrics, which can hold as much or little detail as the client requires including weld points, bill of materials (BOM) and full dimensions; though for API570 NDT work the isos detail can be simplified down.
A3D are currently working on using the extensive property data from the 3D models to help populate written scheme of examinations (WSE’s).
Where are the cost and time savings?
3D scanning is considerably faster than any other surveying method, its able to produce nearly 2 million recordable data points per second, A3D have case studies proving this, including a job of surveying a 70,000m2 oil storage depot in Europe made up of 26 tanks, 22 pumps and 10 road loading bays; and it was surveyed in 4 days, a terminal this size would traditionally take at least a year to survey the pipework.
How are the isos kept up to date?
The isometrics are a live link to the 3D model, this means if the model is updated, then the isos will reflect those changes, which sounds like extra training and software, but it again has been proven that its quicker and easier to update a model than it is to update hundreds or thousands of 2D isometrics.
P&IDs can also be built in the same package, which gives a huge added benefit of cross validation, so if the model is updated the P&ID will validate an issue that its P&ID counterpart is out of date. Not only is this a huge time saving but it also relieves a lot of human error.
How else can the point cloud and model be used?
The 3D laser scanner can’t be switched to only record pipework, so during the survey process we are recording everything, steelwork, topographical data, cable trays, tank wall plates. So once we have finished surveying a site we have a broad range of survey data. A great example of this was with a site in Dublin, client asked us to survey their site to produce the site isometrics for upcoming NDT inspection, we produced a 3D model and exported the isos and everything went smoothly, the client later came back and asked for P&IDs, bund volume calculations and GA layouts and because of the survey data we were able to complete them without having to return to site.
The Benefits
There are many benefits, as we are first able to produce the drawings a lot faster and cheaper than traditional methods, but our clients are also able to receive realistic costings from NDT companies as your able to supply the drawings for quoting purposes; also with the NDT team will be expected to complete the work quicker as they aren’t subject to building the isos whilst testing.
Keeping the isos up to date is easy as its all controlled through the model and at the end of the project you still have a model and point cloud data, which can be used for a range of other projects including design.
4D Lizard Software and NDT
Our 4D Lizard EAM software has had a lot of NDT direction recently, with inspection reports being made available through our cloud software, allowing our clients to standardise the way that the NDT data is recorded, so it can later be used for better analytics and helping move companies away from the typical heavy traditional paperwork.
For more information
This article was written by Lewis Boxer,
Technical Director of Advanced 3D Laser Solutions Group.
T: +44 (0)1245 407552
m: +44 (0)7974835571
e: lewis@laseresurveying.com


